 By Lauren Holland
Updated November 2026
An air compressor tire inflator attachment lets you fill tires from a shop-style compressor with far more control than a basic hose. This guide walks you through choosing the right attachment, connecting it correctly, and checking pressure so you finish with tires at the spec your vehicle needs. Most of the work takes less than ten minutes once your setup is in place.
Choose the Right Attachment for Your Compressor
Start by checking the air fitting on your compressor. Most US compressors use a standard 1/4-inch NPT quick-connect coupler, though some use a different size. Match the attachment’s fitting to that coupler before you buy, because a mismatch means leaks or no connection at all.
Shopping for one? See our guide: 6 Best Car Battery Charger and Air Compressor Combos (2026).
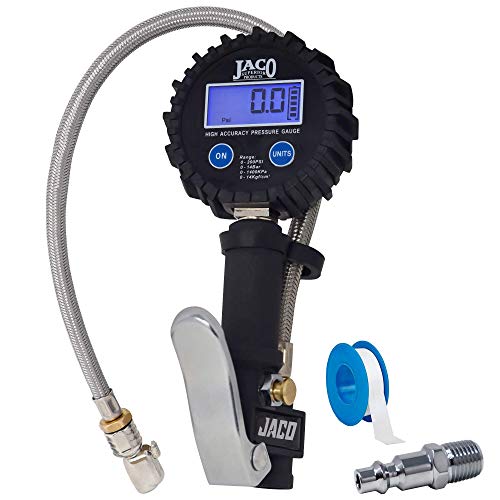
Next, look at the chuck style. A dual-head or lock-on chuck grips the valve stem firmly and reduces air loss. A simple push-on chuck works but tends to leak if the valve core is worn. Some attachments include an inline pressure gauge, which is useful when your compressor’s own gauge is not precise enough for tire work.
Set Up and Inflate Safely
Before you connect anything, confirm the target pressure. Look for the cold inflation pressure on the placard inside the driver’s door jamb or in the owner’s manual. Do not use the maximum pressure printed on the tire sidewall, since that number is a ceiling, not a recommendation for your vehicle. For another angle, check out 6 Best Tire Inflator Portable Air Compressors: Top Picks Compared (2026).
- Set the compressor regulator to a pressure a little above your target, then dial it down. Many regulators overshoot when you first start the motor.
- Remove the valve cap and keep it somewhere safe.
- Press the chuck straight onto the valve stem and hold it firmly. Do not tilt it, or air will escape around the seal.
- Inflate in short bursts, checking the tire gauge between each one.
- Disconnect the chuck, replace the valve cap, and recheck pressure with a separate gauge after a few minutes.
Tires heat up as you add air, so readings taken right after a long fill can run high. Let the tire sit for a few minutes before making final adjustments. If you are working from a compressor tank, watch the tank gauge too. Running the tank empty can damage the pump and the seals over time.
Check Pressure and Fix Common Connection Problems
A leaking connection usually comes from one of three sources: a worn chuck seal, a damaged valve core, or a loose fitting at the compressor end. Replace the chuck seal first, since it is the cheapest part to swap and the most common failure point. If air still hisses after that, check the valve core with a torque tool or replace it.
| Symptom | Likely cause | What to check |
|---|---|---|
| Hissing at the valve | Worn chuck seal | Replace the seal or the chuck |
| Pressure drops overnight | Slow valve core leak | Tighten or replace the valve core |
| Chuck won’t seat | Wrong valve type | Confirm Schrader or Presta fitting |
| Inflation is slow | Compressor tank low or hose kinked | Let the tank recharge, straighten the hose |
If you run into Presta valve trouble, our guide on Why Won’t My Tire Inflator Presta Valve Connect? Causes and Fixes covers the specific fixes. For a broader comparison of inflation tools, see How to Choose a Portable Tire Inflator.
Recommended gear
- Dual-head inflator chuck: A lock-on chuck grips the valve tightly and reduces the air loss that makes precise pressure hard to hit. View on Amazon
- Digital tire pressure gauge: A separate gauge lets you verify the compressor’s reading, which is important for final checks. View on Amazon
- Replacement chuck seals: Keeping spare seals on hand means a leaking chuck becomes a five-minute fix instead of a trip to the store. View on Amazon
Common Mistakes and Tips
- Inflating to the sidewall maximum instead of the vehicle’s recommended cold pressure.
- Forgetting to recheck pressure after the tire has cooled, which often shows the true reading.
- Running the compressor tank empty, which strains the pump and reduces its lifespan.
- Using a kinked or cracked hose, which slows fill time and can cause inaccurate readings.
- Skipping the valve cap, which lets dirt into the valve core and causes slow leaks.
For a quick overview of how inflators differ from garage compressors, see Cordless vs 12V Tire Inflators vs Garage Compressors.
FAQ
Can I use an air compressor tire inflator attachment on any tire?
Most attachments fit standard Schrader valves on cars, light trucks and motorcycles. Presta valves, common on road bikes, need a matching chuck or adapter, so confirm the valve type first.
What pressure should I set on the compressor?
Set the regulator just above your target cold pressure, then fill in short bursts and check with a separate gauge. The target number comes from your vehicle’s door placard or owner’s manual.
Why does my tire lose pressure after I inflate it?
The most common cause is a slow leak at the valve core or chuck seal. Check the valve with a little soapy water; bubbles mean a leak that needs tightening or replacement. If you have doubts about a tire’s structural condition, have a tire shop inspect it.
Conclusion
Matching the attachment to your compressor’s fitting, filling in short bursts, and checking with a separate gauge covers most of what you need. Keep spare seals on hand so small leaks never turn into a stalled job. With those habits, your garage compressor will keep tires at the right pressure for years.
Related reading
- Turbo Air Tire Inflator: How to Use One Safely and Get Accurate Pressure
- Cordless vs 12V Tire Inflators vs Garage Compressors
- Why Won't My Tire Inflator Presta Valve Connect? Causes and Fixes
- Tire Repair Inflator Kit: How to Plug and Reinflate a Flat in 15 Minutes
- Tire Inflator Nozzle Replacement: A Step-by-Step Guide for Beginners
- Tire Inflator Battery Operated: How to Choose and Use One Safely
Ready to choose one?
About Lauren Holland
Lauren Holland is part of our editorial team and reviews and edits our car care & garage supplies guides, checking product details against manufacturer specifications and owner feedback.